Wheatstone Bridges and Strain Gauges
All strain-gauge configurations are based on the concept of a Wheatstone bridge. A Wheatstone bridge is a network of four resistive legs. One or more of these legs can be active sensing elements. Figure 1-1 shows a Wheatstone bridge circuit diagram. 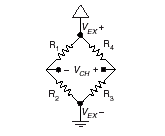
Figure 1-1. Basic Wheatstone Bridge Circuit Diagram
The Wheatstone bridge is the electrical equivalent of two parallel voltage divider circuits. R1 and R2 compose one voltage divider circuit, and R4 and R3 compose the second voltage divider circuit. The output of a Wheatstone bridge is measured between the middle nodes of the two voltage dividers.
A physical phenomena, such as a change in strain applied to a specimen or a temperature shift, changes the resistance of the sensing elements in the Wheatstone bridge. The Wheatstone bridge configuration is used to help measure the small variations in resistance that the sensing elements produce corresponding to a physical change in the specimen.
Strain-gauge configurations are arranged as Wheatstone bridges. The gauge is the collection of all of the active elements of the Wheatstone bridge. There are three types of strain-gauge configurations: quarter-bridge, half-bridge, and full-bridge. The number of active element legs in the Wheatstone bridge determines the kind of bridge configuration. Refer to Table 1-1 to see how many active elements are in each configuration.

Each of these three configurations is subdivided into multiple configuration types. The orientation of the active elements and the kind of strain measured determines the configuration type. National Instruments (NI) supports seven various configuration types in software. However, with custom software scaling all Wheatstone bridge configuration types can be used with any NI hardware product that supports your gauge configuration type.
The supported strain gauge configuration types measure axial strain, bending strain, or both. While some similar configuration types can be used to measure torsional strain, NI’s software scaling does not support these configuration types. It is possible to use NI products to measure torsional strain, but to properly scale these configuration types you must create a custom scale in Measurement & Automation Explorer (MAX) or perform scaling in your software application.
This document discusses all of the mechanical, electrical, and scaling considerations of each strain-gauge configuration type supported by NI.
Acronyms, Formulas, and Variable Definitions
In the figures and equations in this document, the acronyms, formulas, and variables are defined as:
e is the measured strain (+e is tensile strain and -e is compressive strain).
eS is the simulated strain.
GF is the Gauge Factor, which should be specified by the gauge manufacturer.
Rg is the nominal gauge resistance, which should be specified by the gauge manufacturer.
RL is the lead resistance. If lead lengths are long, RL can significantly impact measurement accuracy.
Rs is the shunt calibration resistor value.
U is the ratio of expected signal voltage to excitation voltage with the shunt calibration circuit engaged. Parameter U appears in the equations for simulated strain and is defined by the following equation:
n is the Poisson’s ratio, defined as the negative ratio of transverse strain to axial strain (longitudinal) strain.
VCH is the measured signal’s voltage.
VEX is the excitation voltage.
Vr is the voltage ratio that is used in the voltage to strain conversion equations and is defined by the following equation:
Software Scaling and Equations
Once you have acquired the voltage signal VCH , you can scale this voltage to the appropriate strain units in software. This is done automatically for you in traditional NI-DAQ using the strain virtual channel and in NI-DAQmx using a strain task or strain channel. You can also scale the voltages manually in your application using the voltage to strain conversion equations provided in this document for each configuration type.
Finally, there are voltage to strain conversion functions included in LabVIEW, traditional NI-DAQ, and NI-DAQmx. In LabVIEW, the conversion function, Convert Strain Gauge Reading.vi, is in the Data Acquisition»Signal Conditioning subpalette. The prototypes for the NI-DAQ functions, Strain_Convert and Strain_Buf_Convert, are in the header file convert.h for C/C++, and convert.bas for Visual Basic. In LabVIEW 7.x or earlier, refer to the Traditional NI-DAQ User Manual and the LabVIEW Measurements Manual for more information. In LabVIEW 8.0 or later, refer to the Traditional NI-DAQ User Manual and the Strain Gauges topic in the LabVIEW Help.
The names given the strain-gauge types in the following sections directly correspond to bridge selections in MAX and the LabVIEW Convert Strain Gauge Reading VI.
Quarter-Bridge Type I
This section provides information for the quarter-bridge strain-gauge configuration type I. The quarter-bridge type I measures either axial or bending strain.
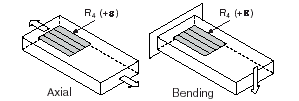
Figure 1-2. Quarter-Bridge Type I Measuring Axial and Bending Strain
A quarter-bridge type I has the following characteristics:
• A single active strain-gauge element is mounted in the principle direction of axial or bending strain.
• A passive quarter-bridge completion resistor (dummy resistor) is required in addition to half-bridge completion.
• Temperature variation in specimen decreases the accuracy of the measurements.
• Sensitivity at 1000 me is ~ 0.5 mVout/ VEX input.

Figure 1-3. Quarter-Bridge Type I Circuit Diagram
The following symbols apply to the circuit diagram and equations:
• R1 and R2 are half-bridge completion resistors.
• R3 is the quarter-bridge completion resistor (dummy resistor).
• R4 is the active strain-gauge element measuring tensile strain (+e).
To convert voltage readings to strain units use the following equation:
To simulate the effect on strain of applying a shunt resistor across R3, use the following equation:
This section provides information for the quarter-bridge strain-gauge configuration type II. The quarter-bridge type II measures either axial or bending strain.

Figure 1-4. Quarter-Bridge Type II Measuring Axial and Bending Strain
A quarter-bridge type II has the following characteristics:
• One active strain-gauge element and one passive, temperature-sensing quarter-bridge element (dummy gauge). The active element is mounted in the direction of axial or bending strain. The dummy gauge is mounted in close thermal contact with the strain specimen but not bonded to the specimen, and is usually mounted transverse (perpendicular) to the principle axis of strain.
• This configuration is often confused with the half-bridge type I configuration, with the difference being that in the half-bridge type I configuration the R3 element is active and bonded to the strain specimen to measure the effect of Poisson’s ratio.
• Completion resistors provide half bridge completion.
• Compensates for temperature.
• Sensitivity at 1000 me is ~ 0.5 mVout/ VEX input.
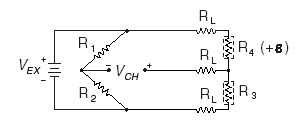
Figure 1-5. Quarter-Bridge Type II Circuit Diagram
The following symbols apply to the circuit diagram and equations:
• R1 and R2 are a half-bridge completion resistors.
• R3 is the quarter-bridge temperature-sensing element (dummy gauge).
• R4 is the active strain-gauge element measuring tensile strain (+e).
To convert voltage readings to strain units use the following equation:
To simulate the effect on strain of applying a shunt resistor across R3, use the following equation:
This section provides information for the half-bridge strain-gauge configuration type I. The half-bridge type I measures either axial or bending strain.
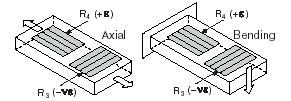
Figure 1-6. Half-bridge Type I Measuring Axial and Bending Strain
A half-bridge type I has the following characteristics:
• Two active strain-gauge elements. One is mounted in the direction of axial strain, the other acts as a Poisson gauge and is mounted transverse (perpendicular) to the principal axis of strain.
• Completion resistors provide half bridge completion.
• Sensitive to both axial and bending strain.
• Compensates for temperature
• Compensates for the aggregate effect on the principle strain measurement due to the Poisson’s ratio of the specimen material.
• Sensitivity at 1000 me is ~ 0.65 mVout/ VEX input.

Figure 1-7. Half-Bridge Type I Circuit Diagram
The following symbols apply to the circuit diagram and equations:
• R1 and R2 are half-bridge completion resistors.
• R3 is the active strain-gauge element measuring compression from Poisson effect (–ne).
• R4 is the active strain-gauge element measuring tensile strain (+e).
To convert voltage readings to strain units use the following equation:
To simulate the effect on strain of applying a shunt resistor across R3, use the following equation:
This section provides information for the half-bridge strain-gauge configuration type II. The half-bridge type II only measures bending strain.
Figure 1-8. Half-Bridge Type II Rejecting Axial and Measuring Bending Strain
A half-bridge type II configuration has the following characteristics:
• Two active strain-gauge elements. One is mounted in the direction of bending strain on one side of the strain specimen (top), the other is mounted in the direction of bending strain on the opposite side (bottom).
• Completion resistors provide half bridge completion.
• Sensitive to bending strain.
• Rejects axial strain.
• Compensates for temperature.
• Sensitivity at 1000 me is ~ 1 mVout/ VEX input.
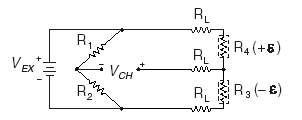
Figure 1-9. Half-Bridge Type II Circuit Diagram
The following symbols apply to the circuit diagram and equations:
• R1 and R2 are half-bridge completion resistors.
• R3 is the active strain-gauge element measuring compressive strain (–e).
• R4 is the active strain-gauge element measuring tensile strain (+e).
To convert voltage readings to strain units use the following equation:
To simulate the effect on strain of applying a shunt resistor across R3, use the following equation:
This section provides information for the full-bridge strain-gauge configuration type I. The full-bridge type I only measures bending strain.

Figure 1-10. Full-Bridge Type I Rejecting Axial and Measuring Bending Strain
A full-bridge type I configuration has the following characteristics:
• Four active strain-gauge elements. Two are mounted in the direction of bending strain on one side of the strain specimen (top), the other two are mounted in the direction of bending strain on the opposite side (bottom).
• Highly sensitive to bending strain.
• Rejects axial strain.
• Compensates for temperature.
• Compensates for lead resistance.
• Sensitivity at 1000 me is ~ 2.0 mVout / VEX input.
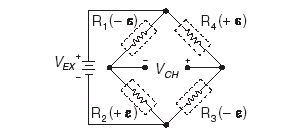
Figure 1-11. Full-Bridge Type I Circuit Diagram
The following symbols apply to the circuit diagram and equations:
• R1 is an active strain-gauge element measuring compressive strain (–e).
• R2 is an active strain-gauge element measuring tensile strain (+e).
• R3 is an active strain-gauge element measuring compressive strain (–e).
• R4 is an active strain-gauge element measuring tensile strain (+e).
To convert voltage readings to strain units use the following equation:
To simulate the effect on strain of applying a shunt resistor across R3, use the following equation:
This section provides information for the full-bridge type II strain-gauge configuration. The full-bridge type II only measures bending strain.
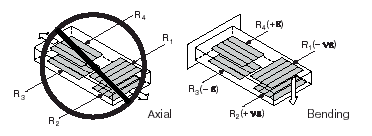
Figure 1-12. Full-Bridge Type II Rejecting Axial and Measuring Bending Strain
A full-bridge type II configuration has the following characteristics:
• Four active strain-gauge elements. Two are mounted in the direction of bending strain with one on one side of the strain specimen (top), the other on the opposite side (bottom). The other two act together as a Poisson gauge and are mounted transverse (perpendicular) to the principal axis of strain with one on one side of the strain specimen (top), the other on the opposite side (bottom).
• Rejects axial strain.
• Compensates for temperature.
• Compensates for the aggregate effect on the principle strain measurement due to the Poisson’s ratio of the specimen material.
• Compensates for lead resistance.
• Sensitivity at 1000 me is ~ 1.3 mVout / VEX input.
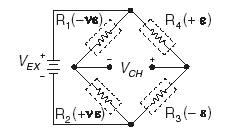
Figure 1-13. Full-Bridge Type II Circuit Diagram
The following symbols apply to the circuit diagram and equations:
• R1 is an active strain-gauge element measuring compressive Poisson effect (–ne).
• R2 is an active strain-gauge element measuring tensile Poisson effect (+ne).
• R3 is an active strain-gauge element measuring compressive strain (–e).
• R4 is an active strain-gauge element measuring tensile strain (+e).
To convert voltage readings to strain units use the following equation:
To simulate the effect on strain of applying a shunt resistor across R3, use the following equation:
This section provides information for the full-bridge strain-gauge configuration type III. The full-bridge type III only measures axial strain.
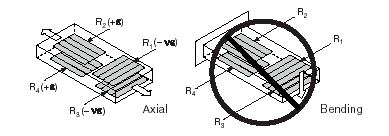
Figure 1-14. Full-Bridge Type III Measuring Axial and Rejecting Bending Strain
A full-bridge type III configuration has the following characteristics:
• Four active strain-gauge elements. Two are mounted in the direction of axial strain with one on one side of the strain specimen (top), the other on the opposite side (bottom). The other two act together as a Poisson gauge and are mounted transverse (perpendicular) to the principal axis of strain with one on one side of the strain specimen (top), the other on the opposite side (bottom).
• Compensates for temperature.
• Rejects bending strain.
• Compensates for the aggregate effect on the principle strain measurement due to the Poisson’s ratio of the specimen material.
• Compensates for lead resistance.
• Sensitivity at 1000 me is ~ 1.3 mVout / VEX input.
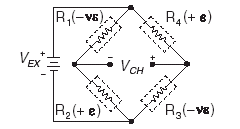
Figure 1-15. Full-Bridge Type III Circuit Diagram
The following symbols apply to the circuit diagram and equations:
• R1 is an active strain-gauge element measuring compressive Poisson effect (–ne).
• R2 is an active strain-gauge element measuring tensile strain (+e).
• R3 is an active strain-gauge element measuring compressive Poisson effect (–ne).
• R4 is an active strain-gauge element measuring the tensile strain (+e).
To convert voltage readings to strain units use the following equation:
To simulate the effect on strain of applying a shunt resistor across R3, use the following equation:


+ comments + 1 comments
Good work of implementing the formulas about strain gauge theory