What Is Strain?
Strain is the amount of deformation of a body due to an applied force. More specifically, strain (e) is defined as the fractional change in length, as shown in Figure 1 below.
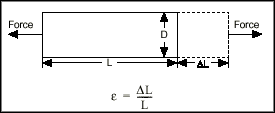
Figure 1. Definition of Strain
Strain can be positive (tensile) or negative (compressive). Although dimensionless, strain is sometimes expressed in units such as in./in. or mm/mm. In practice, the magnitude of measured strain is very small. Therefore, strain is often expressed as microstrain (me), which is e x 10-6.
When a bar is strained with a uniaxial force, as in Figure 1, a phenomenon known as Poisson Strain causes the girth of the bar, D, to contract in the transverse, or perpendicular, direction. The magnitude of this transverse contraction is a material property indicated by its Poisson's Ratio. The Poisson's Ratio n of a material is defined as the negative ratio of the strain in the transverse direction (perpendicular to the force) to the strain in the axial direction (parallel to the force), or n = eT/e. Poisson's Ratio for steel, for example, ranges from 0.25 to 0.3.
The Strain Gauge
While there are several methods of measuring strain, the most common is with a strain gauge, a device whose electrical resistance varies in proportion to the amount of strain in the device. The most widely used gauge is the bonded metallic strain gauge.
The metallic strain gauge consists of a very fine wire or, more commonly, metallic foil arranged in a grid pattern. The grid pattern maximizes the amount of metallic wire or foil subject to strain in the parallel direction (Figure 2). The cross sectional area of the grid is minimized to reduce the effect of shear strain and Poisson Strain. The grid is bonded to a thin backing, called the carrier, which is attached directly to the test specimen. Therefore, the strain experienced by the test specimen is transferred directly to the strain gauge, which responds with a linear change in electrical resistance. Strain gauges are available commercially with nominal resistance values from 30 to 3000 Ω, with 120, 350, and 1000 Ω being the most common values.
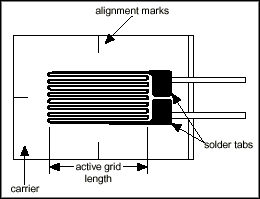
Figure 2. Bonded Metallic Strain Gauge
It is very important that the strain gauge be properly mounted onto the test specimen so that the strain is accurately transferred from the test specimen, through the adhesive and strain gauge backing, to the foil itself.
A fundamental parameter of the strain gauge is its sensitivity to strain, expressed quantitatively as the gauge factor (GF). Gauge factor is defined as the ratio of fractional change in electrical resistance to the fractional change in length (strain):
The Gauge Factor for metallic strain gauges is typically around 2.
Strain Gauge Measurement
In practice, the strain measurements rarely involve quantities larger than a few millistrain(e x 10-3). Therefore, to measure the strain requires accurate measurement of very small changes in resistance. For example, suppose a test specimen undergoes a strain of 500 me. A strain gauge with a gauge factor of 2 will exhibit a change in electrical resistance of only 2 (500 x 10-6) = 0.1%. For a 120 W gauge, this is a change of only 0.12 W.
To measure such small changes in resistance, strain gauges are almost always used in a bridge configuration with a voltage excitation source. The general Wheatstone bridge, illustrated below, consists of four resistive arms with an excitation voltage, VEX, that is applied across the bridge.

Figure 3. Wheatstone Bridge
The output voltage of the bridge, VO, will be equal to:
From this equation, it is apparent that when R1/R2 = R4/R3, the voltage output VO will be zero. Under these conditions, the bridge is said to be balanced. Any change in resistance in any arm of the bridge will result in a nonzero output voltage.
Therefore, if we replace R4 in Figure 3 with an active strain gauge, any changes in the strain gauge resistance will unbalance the bridge and produce a nonzero output voltage. If the nominal resistance of the strain gauge is designated as RG, then the strain-induced change in resistance, DR, can be expressed as DR = RG·GF·e. Assuming that R1 = R2 and R3 = RG, the bridge equation above can be rewritten to express VO/VEX as a function of strain (see Figure 4). Note the presence of the 1/(1+GF·e/2) term that indicates the nonlinearity of the quarter-bridge output with respect to strain.
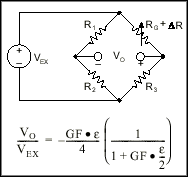
Figure 4. Quarter-Bridge Circuit
Ideally, we would like the resistance of the strain gauge to change only in response to applied strain. However, strain gauge material, as well as the specimen material to which the gauge is applied, will also respond to changes in temperature. Strain gauge manufacturers attempt to minimize sensitivity to temperature by processing the gauge material to compensate for the thermal expansion of the specimen material for which the gauge is intended. While compensated gauges reduce the thermal sensitivity, they do not totally remove it.
By using two strain gauges in the bridge, the effect of temperature can be further minimized. For example, Figure 5 illustrates a strain gauge configuration where one gauge is active (RG + DR), and a second gauge is placed transverse to the applied strain. Therefore, the strain has little effect on the second gauge, called the dummy gauge. However, any changes in temperature will affect both gauges in the same way. Because the temperature changes are identical in the two gauges, the ratio of their resistance does not change, the voltage VO does not change, and the effects of the temperature change are minimized.
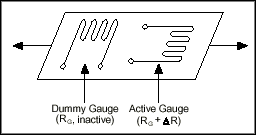
Figure 5. Use of Dummy Gauge to Eliminate Temperature Effects
The sensitivity of the bridge to strain can be doubled by making both gauges active in a half-bridge configuration. For example, Figure 6 illustrates a bending beam application with one bridge mounted in tension (RG + DR) and the other mounted in compression (RG - DR). This half-bridge configuration, whose circuit diagram is also illustrated in Figure 6, yields an output voltage that is linear and approximately doubles the output of the quarter-bridge circuit.
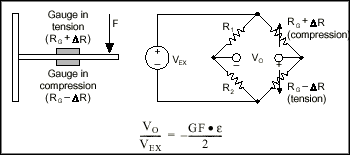
Figure 6. Half-Bridge Circuit
Finally, you can further increase the sensitivity of the circuit by making all four of the arms of the bridge active strain gauges in a full-bridge configuration. The full-bridge circuit is shown in Figure 7.
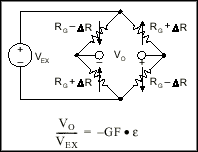
Figure 7. Full-Bridge Circuit
The equations given here for the Wheatstone bridge circuits assume an initially balanced bridge that generates zero output when no strain is applied. In practice however, resistance tolerances and strain induced by gauge application will generate some initial offset voltage. This initial offset voltage is typically handled in two ways. First, you can use a special offset-nulling, or balancing, circuit to adjust the resistance in the bridge to rebalance the bridge to zero output. Alternatively, you can measure the initial unstrained output of the circuit and compensate in software.
The equations given above for quarter, half, and full-bridge strain gauge configurations assume that the lead wire resistance is negligible. While ignoring the lead resistances may be beneficial to understanding the basics of strain gauge measurements, doing so in practice can be a major source of error. For example, consider the 2-wire connection of a strain gauge shown in Figure 8a. Suppose each lead wire connected to the strain gauge is 15 m long with lead resistance RL equal to 1 W. Therefore, the lead resistance adds 2 W of resistance to that arm of the bridge. Besides adding an offset error, the lead resistance also desensitizes the output of the bridge.
You can compensate for this error by measuring the lead resistance RL and accounting for it in the strain calculations. However, a more difficult problem arises from changes in the lead resistance due to temperature fluctuations. Given typical temperature coefficients for copper wire, a slight change in temperature can generate a measurement error of several me.
Using a 3-wire connection can eliminate the effects of variable lead wire resistance because the lead resistances affect adjacent legs of the bridge. As seen in Figure 8b, changes in lead wire resistance, RL2, do not change the ratio of the bridge legs R3 and RG. Therefore, any changes in resistance due to temperature cancel each other.
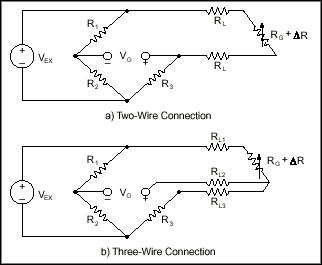
Figure 8. 2-Wire and 3-Wire Connections of Quarter-Bridge Circuit
Signal Conditioning for Strain Gauges
Strain gauge measurement involves sensing extremely small changes in resistance. Therefore, proper selection and use of the bridge, signal conditioning, wiring, and data acquisition components are required for reliable measurements. To ensure accurate strain measurements, it is important to consider the following:
- Bridge completion
- Excitation
- Remote sensing
- Amplification
- Filtering
- Offset
- Shunt calibration
Bridge Completion – Unless you are using a full-bridge strain gauge sensor with four active gauges, you will need to complete the bridge with reference resistors. Therefore, strain gauge signal conditioners typically provide half-bridge completion networks consisting of high-precision reference resistors. Figure 9 shows the wiring of a half-bridge strain gauge circuit to a conditioner with completion resistors R1 and R2.
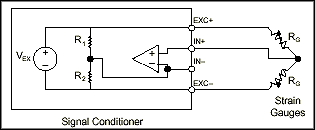
Figure 9. Connection of Half-Bridge Strain Gauge Circuit
Excitation – Strain gauge signal conditioners typically provide a constant voltage source to power the bridge. While there is no standard voltage level that is recognized industry wide, excitation voltage levels of around 3 and 10 V are common. While a higher excitation voltage generates a proportionately higher output voltage, the higher voltage can also cause larger errors because of self-heating.
Remote Sensing – If the strain gauge circuit is located a distance away from the signal conditioner and excitation source, a possible source of error is voltage drop caused by resistance in the wires connecting the excitation voltage to the bridge. Therefore, some signal conditioners include a feature called remote sensing to compensate for this error. Remote sense wires are connected to the point where the excitation voltage wires connect to the bridge circuit. The extra sense wires serve to regulate the excitation supply through negative feedback amplifiers to compensate for lead losses and deliver the needed voltage at the bridge.
Amplification – The output of strain gauges and bridges is relatively small. In practice, most strain gauge bridges and strain-based transducers will output less than 10 mV/V (10 mV of output per volt of excitation voltage). With 10 V excitation, the output signal will be 100 mV. Therefore, strain gauge signal conditioners usually include amplifiers to boost the signal level to increase measurement resolution and improve signal-to-noise ratios.
Filtering – Strain gauges are often located in electrically noisy environments. It is therefore essential to be able to eliminate noise that can couple to strain gauges. Lowpass filters, when used in conjunction with strain gauges, can remove high-frequency noise prevalent in most environmental settings.
Offset Nulling – When a bridge is installed, it is very unlikely that the bridge will output exactly zero volts when no strain is applied. Slight variations in resistance among the bridge arms and lead resistance will generate some nonzero initial offset voltage. Offset nulling can be performed by either hardware or software:
1. Software Compensation – With this method, you take an initial measurement before strain input is applied, and use this offset to compensate subsequent measurements. This method is simple, fast, and requires no manual adjustments. The disadvantage of the software compensation method is that the offset of the bridge is not removed. If the offset is large enough, it limits the amplifier gain you can apply to the output voltage, thus limiting the dynamic range of the measurement.
2. Offset-Nulling Circuit – The second balancing method uses an adjustable resistance, a potentiometer, to physically adjust the output of the bridge to zero. By varying the resistance of potentiometer, you can control the level of the bridge output and set the initial output to zero volts.
Shunt Calibration – The normal procedure to verify the output of a strain gauge measurement system relative to some predetermined mechanical input or strain is called shunt calibration. Shunt calibration involves simulating the input of strain by changing the resistance of an arm in the bridge by some known amount. This is accomplished by shunting, or connecting, a large resistor of known value across one arm of the bridge, creating a known DR. The output of the bridge can then be measured and compared to the expected voltage value. The results are used to correct span errors in the entire measurement path, or to simply verify general operation to gain confidence in the setup.


